Hello, it has been a long time since I have posted here! The end of the school year is always tough for me between trying to get all of the AP Portfolios submitted, navigating the end of the year to-do's, trying to accommodate mixed classes with the interruption of standardized testing, the list goes on, BUT the good news is I'm back!
So here is a new Practical Teaching Tip that I discovered this semester, plastic storage boxes. Typically I put out the art materials at the students' tables in a white container which is at each table and then change them out for each project. The issue with this is that it took time for me to sort through the materials and put them out each time we started a new project. The *NEW* solution I came up with, is to buy the cheapy plastic pencil boxes and put specific materials in them. For example, I have a box of just markers for each table and another one for just colored pencils. When the kids need to use them, I just put them out. Normally I have a drawer of colored pencils or markers and pulled some out and bundled them for that week, but that takes time and I typically didn't have enough of each color for each table. This makes it easier because the boxes already have all of the colors that they need in them and then I just switch out the boxes for the projects. I think I paid about 88 cents for each box, but for me it has been worth it. I also believe that in the summer as school approaches office supply stores such as Office Depot and Staples have great teacher discounts. Also, I don't let my students sharpen their colored pencils in the electric pencil sharpener (due to the pencil sharpener eating the pencils up and the wax from the colored pencils getting into the pencil sharpener), I normally have a few hand held pencil sharpeners on the white board for students to use, but next year I am going to have a hand held pencil sharpeners in their box with their colored pencils.
Next year I am going to create boxes for each table with clay tools (saw this at another school in our county where the teacher used plastic utensil organizers to store the clay tools) and a system for paint. I bought some plastic soufflé cups from Dick Blick to store glaze in, but never used them. So next year I am going to use these to put some acrylic paint of each color in the cup and then put them in a larger storage box that I can easily place at each table when needed.
Pros to Organizing Materials into Plastic Storage Boxes:
1. The boxes are clear so it is easy for me to see as I check the tables for clean up if all of the materials are there or if there is junk in there (like pencil shavings or paper- high schoolers are notorious for being lazzzyyyy in this aspect).
2. It is easy for me to get the materials out because they are already in the boxes I just need to pop them on the table or have a student do it.
3. I am a BIG fan of having the materials at their table and easily accessible. I typically have anywhere from 25-36 students in a class, and the less they have to move around the less disruptions there are.
Cons:
1. The plastic containers cost money, but I believe they are a good one or two time investment.
2. When you buy el cheapo sometimes they break, which I am noticing I will have to replace a few of them for next year- bummer.
3. Sometimes the boxes become a dumping ground for trash, which I have to kindly remind them to clean up.
4. Sometimes the students trade or borrow colors from another table, and forget to give it back to the original table, so then the colors are mixed up. I haven't come up with a good solution to this one yet, I may just have to let this OCD part go :)
What are some practical ways that you organize materials for your classroom? I would love to hear your ideas!
Showing posts with label Practical Teaching Tips. Show all posts
Showing posts with label Practical Teaching Tips. Show all posts
Friday, May 16, 2014

Tuesday, April 8, 2014
Practical Teaching Tip: Another way to label ceramic glazes
Back in January I created a post called "Practical Teaching Tip: Classroom Organization" in this post I talked about a way that I have been making sample tiles of the glaze and then gluing them to the top of the jar of glaze. One of the issues I faced with this was that the tiles would fall off (and then I am constantly re-gluing them on the top of the jar).
New Solution: This past week I got a few new underglazes and didn't have time to make sample tiles. What I ended up doing was printing off color pictures of the underglaze from the website and then taping them to the top of the jar. WOW how did I not think of that before? The only issue is that the samples listed on the website for underglaze show the tile with a clear coat on top, so unless the students have seen a piece come out of the kiln without the clear coat they wouldn't know that you have to put a clear coat to make the glaze food safe. However, since I have other sample tiles without the clear coat and the students know about underglaze and its properties, this isn't an issue in my class.
In conclusion, this is definitely an easier way to show the students what the glaze should turn out like, rather than making a sample tile that will probably need to be re-glued a couple times. There is a photo below of my *NEW and UPDATED* Practical Teaching Tip on labeling glazes. Enjoy :)
 |
| You can see above the underglazes that have my sample tile (not glossy) and the image printed from the website which shows the underglaze with a clear coat |
Wednesday, March 19, 2014
Project for a Substitute Teacher: Art Vocabulary Application Worksheet
I find planning for a sub more difficult than when I am just here at school, that's one of the reasons I try not to take off much work! When I do, however, I find myself debating, "How much do I trust the kids? How much do I trust the sub? Am I going to come back to art supplies all around the room? Are they going to finish the assignment in 5 minutes and then have nothing to do?" I have a slue of horror stories about subs, but the great thing is that I will have at least one honest kid who will tell me what really went down while the sub was here :)
Anyway, I am always on the lookout on activities for my students to do while I am gone (just in case). I am taking some of my kids on a field trip this Friday, so last week I was searching for something for the rest of my kids to do while I'm out. (It is also the day before spring break, so I needed to make sure that there is enough rigor in my plans so that they can focus and not get all crazy.) Luckily, I have found an awesome sub who is an artist, so letting them use limited art supplies hasn't been an issue. While searching the web and Pinterest I had a hard time finding something that I liked, so I just created my own.
Lesson: Art Vocabulary Application Worksheet for Sub
Materials: worksheet, list of vocabulary words, pencil, colored pencils, hand held pencil sharpeners, scissors, magazines, glue sticks (I keep the art supplies on their tables and assign a table leader to make sure everything gets put away properly)
Each student will get a packet of the same worksheet copied 4 times. The worksheet has 4 different boxes. The first box prompts the students to look up the definition of the word in the art textbooks at their table, the next box has the student draw an example of the word, the following has the student cut an image from a magazine that illustrates the word and the last box requires the student to use this vocabulary word in a sentence. The students will repeat this process on the 3 other pages attached to the packet with different words that they have selected from the list. When I return, I will look through the packets and select the best examples, then I will have that student teach the class that art vocabulary word and the students will take notes. Then, the students will have a quiz on those vocabulary words.
Benefits:
- There are a lot of different tasks that the students have to complete in a limited amount of time, leaving less time for them to horse around.
- The students are going through the basic learning cycle by looking up the definition, applying it and then teaching the class.
- They still get to use some art supplies. If I have them do a writing assignment inevitably I hear "Why are we doing reading and writing in art class?"
- It puts the responsibility of learning back onto the students. I'm not giving a 20 minute lecture over essential art vocabulary, but they are teaching themselves and the class about the words.
 |
| Art Vocabulary Application Worksheet |
 |
| List of Art Vocabulary Words |
Thursday, February 6, 2014
Practical Teaching Tip: The "I'm Done" Binder
In my classroom my students are usually working on a couple assignments at a time. Finishing up one and starting to glaze another one. There are times though, after they have finished their artwork and sketchbook assignment, that there is some down time. If I just tell the students to do homework from another class or read a book, it usually doesn't happen and extra talking and disruption emerges. By nature I am a busy body, so I don't like there to be any down time. When this instance does occur I have created a solution the "I'm done" Binder.


What is the "I'm Done" Binder?
I'm so glad you asked :) The "I'm Done" Binder is composted of 8 different assignments that the student can complete at their desk independently. They range from coloring pages, to art word searches, to art word finds and even some origami. All I did was search the web, Pinterest and gathered collections from other art teachers and compiled them into one place.
Easy peasy make life easy :)
Friday, January 24, 2014
Practical Teaching Tip: Grading Rubrics
I know there are many schools of thought when it comes to assessment. However, for me I have found that utilizing detailed rubrics have been most productive in a high school setting.
Reasons detailed grading rubrics works:
3D: Glaze Rubric
Project Title:
How do you grade art? I would love to hear NEW ideas :)
Happy Friday Art Lovers! Take time this weekend to make some art for yourself even if its just a drawing in a sketchbook.
Reasons detailed grading rubrics works:
- Students have a clear understanding of what I am looking for when I grade their projects
- Students are able to complete mid-project checks or formative assessments based on what they need to change or work on before they turn the project in
- Students can use the rubric to grade one another
- Parents have a clear understanding of how I am accessing their student's artwork
- My opinion about whether I think the art is "good" does not come into play
- It is very easy and fast to grade a project when all you have to do is check off boxes
- When I grade projects I do it during class through a critique so the students know what their grade is right away
Sample Glaze Rubric
(my ceramic projects get graded once for the project before it goes into the kiln and then again after it has been glaze fired)
3D: Glaze Rubric
Project Title:
Name: Class Period: Grade: /35
1. Sketch a diagram of your piece on the back, color it with colored pencil and label the names of the glazes.
2. What color scheme or variation of one did you choose? Circle: Primary, Secondary, Warm, Cool, Neutral, Complimentary, Analogous other:
3. What glazing technique did you use? Circle: Stencils, sgraffito, staining, under glaze, wax resist, layering, glass or mixing
Criteria
|
Weak (1)
|
Poor (2)
|
Average (3)
|
Good (4)
|
Excellent (5)
|
Color Scheme: Choose one of the following above or a variation. Overall the colors go well together.
| |||||
2+ Coats: Student used 2 coats (or more depending on what the label stated) of glaze on entire piece.
| |||||
Wax on Bottom: Student sealed bottom signature with wax. Glaze that accidentally got on the wax should be wiped away with a wet sponge.
| |||||
Technique: Student included one of the techniques listed above
| |||||
Bisque Ware was Properly Cleaned: Student washed piece before it was glazed, there is no crawl.
| |||||
All areas are painted neatly: There is no bare clay body showing, all areas are cleanly painted.
| |||||
Completed Questions Above
|
1
|
-
|
2
|
-
|
3
|
How do you grade art? I would love to hear NEW ideas :)
Happy Friday Art Lovers! Take time this weekend to make some art for yourself even if its just a drawing in a sketchbook.
Friday, January 17, 2014
Practical Teaching Tip: Keeping Expensive or Dangerous Materials Organized
Happy Friday! I found this idea on Pinterest, so I am by no means taking credit for this idea. I've just used it and it has worked, so I thought I would share. When I first began teaching, the thought of letting teenagers use X-acto knives kinda freaked me out, so I wanted to allow them to use X-acto knives, but also be safe and organized with them.


This is what I did:
This is what I did:
- I found some foam that was in my classroom and taped 2 blocks together.
- Then I used the handle of the knife to push holes into the blocks.
- Next I covered the entire block with masking tape and packing tape.
- Finally I cut slits in the tape where my holes in the foam were and labeled each hole with a number.
- I correlated this number to the number on the blade and a sign out sheet for the students.
Now, with a quick glace it is easy for me to distribute the knives and check if there are any missing. I also do this with my thin Sharpie markers as well because for some reason they started to grow legs and walk. :)
Tuesday, January 7, 2014
Practical Teaching Tip: Classroom Organization
WELCOME back! I hope you had a wonderful and relaxing break!
Confession time: I am a organizer/clean freak/over achiever/planner! However, with about 36 students in each of my classes being a clean freak doesn't really mesh well!
Solution time: I work very hard to create an organized system for the students to clean the room and do all other tasks. By training the students in these processes early in the year the students are aware of my expectations and everything begins to run smoothly. This helps me keep my sanity and keeps everything organized.
Labeling: I label almost everything in the room! I get tired of the nagging questions like "Where are the scissors?" by having everything labeled I don't have to answer those questions and I can move onto making art with them.
Cabinets and Tables: Each table is labeled with the name of a 3D artist. This table name correlates with the name on the outside of their cabinet to store their artwork.

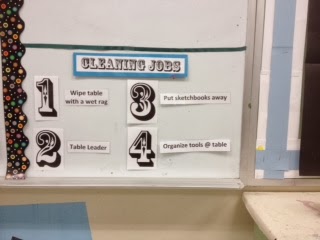
Seat Numbers: Each seat a the table is numbered. This number correlates to a number on the board which details their cleaning job for the week. I rotate these jobs every week. If a student is absent, then the table leader picks up the slack. I also use the seat numbers when collecting papers or randomly calling on students to answer questions.

Glaze Organization: I teach 3D art so we do a lot of ceramics. To keep that area organized I have the carts organized by the effect of the glaze. I create a sample medallion that is glued to the tops of the lids of the glazes. The only issue with this is that sometimes the medallion comes off, so I just re-glue it. I tried hot glue and that didn't work well enough. I am currently using Tacky Glue (I am open to suggestions of stronger glues to hold these sample medallions on).


Table Binders: Each table has a binder with copies of useful handouts. I also put then in plastic sleeves so that they do not get damaged. I put handouts in there from Elements and Principles, to SAT/ACT Vocabulary, and art techniques.

Practical Teaching Tip: Keep it simple and find a system that works for YOU! I have found it usefully to train and re-train the students throughout the year especially after breaks :)
Do you have any organizational systems to share? I would love to hear new organizational tips!
Confession time: I am a organizer/clean freak/over achiever/planner! However, with about 36 students in each of my classes being a clean freak doesn't really mesh well!
Solution time: I work very hard to create an organized system for the students to clean the room and do all other tasks. By training the students in these processes early in the year the students are aware of my expectations and everything begins to run smoothly. This helps me keep my sanity and keeps everything organized.
Labeling: I label almost everything in the room! I get tired of the nagging questions like "Where are the scissors?" by having everything labeled I don't have to answer those questions and I can move onto making art with them.
Cabinets and Tables: Each table is labeled with the name of a 3D artist. This table name correlates with the name on the outside of their cabinet to store their artwork.
Seat Numbers: Each seat a the table is numbered. This number correlates to a number on the board which details their cleaning job for the week. I rotate these jobs every week. If a student is absent, then the table leader picks up the slack. I also use the seat numbers when collecting papers or randomly calling on students to answer questions.
Glaze Organization: I teach 3D art so we do a lot of ceramics. To keep that area organized I have the carts organized by the effect of the glaze. I create a sample medallion that is glued to the tops of the lids of the glazes. The only issue with this is that sometimes the medallion comes off, so I just re-glue it. I tried hot glue and that didn't work well enough. I am currently using Tacky Glue (I am open to suggestions of stronger glues to hold these sample medallions on).
Table Binders: Each table has a binder with copies of useful handouts. I also put then in plastic sleeves so that they do not get damaged. I put handouts in there from Elements and Principles, to SAT/ACT Vocabulary, and art techniques.
Practical Teaching Tip: Keep it simple and find a system that works for YOU! I have found it usefully to train and re-train the students throughout the year especially after breaks :)
Do you have any organizational systems to share? I would love to hear new organizational tips!
Thursday, December 12, 2013
Practical Teaching Tip: Differentiated Instruction Study Guide Visual Art
It's that time of the year....midterms. To help my students study for their exam they are working on a study guide. My PGP (professional growth plan) includes a focus on including more differentiated instructional strategies, so for their study guide I created a Tic-Tac-Toe board. Each prompt has a different prompt which they get to select. The beauty of this project is that I get free visuals out of it. This year I started to make big posters with illustrations on the steps to glazing, creating a slab box, etc. BUT, I was getting behind on other tasks by creating these for each project, so by having them to do this now I can select the best ones to laminate and hang around the room next year.


Assignment Sheet

The posters that I made for my room

Students working on their visuals for the study guide
Subscribe to:
Posts (Atom)