Showing posts with label Glaze. Show all posts

Tuesday, April 8, 2014

Practical Teaching Tip: Another way to label ceramic glazes

Back in January I created a post called "Practical Teaching Tip: Classroom Organization"  in this post I talked about a way that I have been making sample tiles of the glaze and then gluing them to the top of the jar of glaze. One of the issues I faced with this was that the tiles would fall off (and then I am constantly re-gluing them on the top of the jar).

New Solution: This past week I got a few new underglazes and didn't have time to make sample tiles. What I ended up doing was printing off color pictures of the underglaze from the website and then taping them to the top of the jar. WOW how did I not think of that before? The only issue is that the samples listed on the website for underglaze show the tile with a clear coat on top, so unless the students have seen a piece come out of the kiln without the clear coat they wouldn't know that you have to put a clear coat to make the glaze food safe. However, since I have other sample tiles without the clear coat and the students know about underglaze and its properties, this isn't an issue in my class.

In conclusion, this is definitely an easier way to show the students what the glaze should turn out like, rather than making a sample tile that will probably need to be re-glued a couple times. There is a photo below of my *NEW and UPDATED* Practical Teaching Tip on labeling glazes. Enjoy :)

You can see above the underglazes that have my sample tile (not glossy) and the image printed from the website which shows the underglaze with a clear coat


Tuesday, January 7, 2014

Practical Teaching Tip: Classroom Organization

WELCOME back! I hope you had a wonderful and relaxing break!

Confession time: I am a organizer/clean freak/over achiever/planner! However, with about 36 students in each of my classes being a clean freak doesn't really mesh well!

Solution time: I work very hard to create an organized system for the students to clean the room and do all other tasks. By training the students in these processes early in the year the students are aware of my expectations and everything begins to run smoothly. This helps me keep my sanity and keeps everything organized.

Labeling: I label almost everything in the room! I get tired of the nagging questions like "Where are the scissors?" by having everything labeled I don't have to answer those questions and I can  move onto making art with them.

Cabinets and Tables: Each table is labeled with the name of a 3D artist. This table name correlates with the name on the outside of their cabinet to store their artwork.


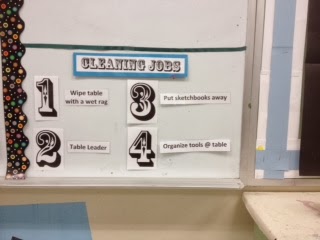
Seat Numbers: Each seat a the table is numbered. This number correlates to a number on the board which details their cleaning job for the week. I rotate these jobs every week. If a student is absent, then the table leader picks up the slack. I also use the seat numbers when collecting papers or randomly calling on students to answer questions.


Glaze Organization: I teach 3D art so we do a lot of ceramics. To keep that area organized I have the carts organized by the effect of the glaze. I create a sample medallion that is glued to the tops of the lids of the glazes. The only issue with this is that sometimes the medallion comes off, so I just re-glue it. I tried hot glue and that didn't work well enough. I am currently using Tacky Glue (I am open to suggestions of stronger glues to hold these sample medallions on).


Table Binders: Each table has a binder with copies of useful handouts. I also put then in plastic sleeves so that they do not get damaged. I put handouts in there from Elements and Principles, to SAT/ACT Vocabulary, and art techniques.


Practical Teaching Tip: Keep it simple and find a system that works for YOU! I have found it usefully to train and re-train the students throughout the year especially after breaks :)

Do you have any organizational systems to share? I would love to hear new organizational tips!